Chevrolet Trax: Headlamp replacement
Chevrolet Trax (2013-2022) Workshop Manual / Accessories & Equipment / Lighting / Lighting - Repair instructions / Headlamp replacement
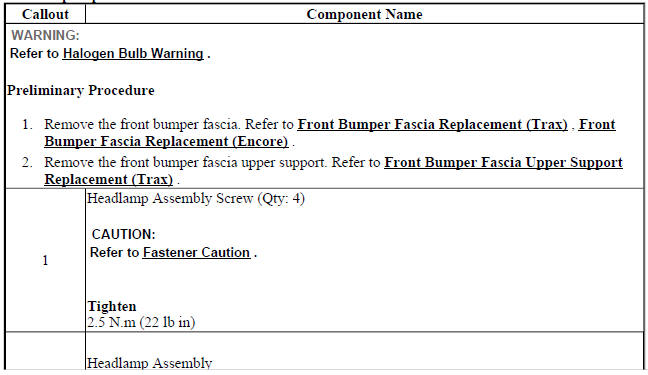
Fig. 23: Headlamp
Headlamp Replacement
.jpg)
HEADLAMP BULB REPLACEMENT - LEFT SIDE (TRAX HIGH BEAM)
.gif)
Fig. 24: Headlamp Bulb - Left Side (High Beam)
Headlamp Bulb Replacement - Left Side (Trax High Beam)
.jpg)
.jpg)
HEADLAMP BULB REPLACEMENT - LEFT SIDE (TRAX LOW BEAM)
Fig. 25: Headlamp Bulb - Left Side (Low Beam)
Headlamp Bulb Replacement - Left Side (Trax Low Beam)
.jpg)
.jpg)
HEADLAMP BULB REPLACEMENT - RIGHT SIDE (HIGH BEAM)
.gif)
Fig. 26: Headlamp Bulb - Right Side (High Beam)
Headlamp Bulb Replacement - Right Side (High Beam)
.jpg)
.gif)
HEADLAMP BULB REPLACEMENT - RIGHT SIDE (LOW BEAM)
Fig. 27: Headlamp Bulb - Right Side (Low Beam)
Headlamp Bulb Replacement - Right Side (Low Beam)
.jpg)
HEADLAMP BRACKET REPLACEMENT
Fig. 28: Headlamp Bracket
Headlamp Bracket Replacement
.jpg)
READ NEXT:
 Headlamp aiming
Visual Aiming Preparation Procedure
NOTE: Some state and
local laws specify requirements for headlamp aim. Comply with
all of these laws when performing any headlamp aiming operations.
Headlamp aim s
Front fog lamp replacement (trax)
Fig. 33: Front Fog Lamp
Front Fog Lamp Replacement (Trax)
FRONT FOG LAMP REPLACEMENT (ENCORE)
Fig. 34: Front Fog Lamp
Front Fog Lamp Replacement (Encore)
FRONT FOG LAMP BULB REPLACEMENT (T
Fog lamp aiming
Preparation Procedure
NOTE:
Horizontal aim is not adjustable on this vehicle. Adjust the fog lamp as
required
using the adjusting screw above the projector lens on the outside of the front
bumper fas
SEE MORE:
Information Displays
Driver Information Center (DIC)
If equipped, the DIC displays
information about your vehicle.
It also displays warning messages if
a system problem is detected. See
Vehicle Messages on page 5-25. All
messages appear in the DIC display
in the instrument cluster. See Trip
Computer and Vehicle
Message
Front brake shield replacement
Removal Procedure
WARNING: Refer to Brake Dust Warning .
Raise and support the vehicle. Refer to Lifting and Jacking the Vehicle
.
Remove the front tire and wheel assembly. Refer to Tire and Wheel
Removal and Installation .
Remove the front brake rotor. Refer to Front Brake Rotor Replacement
© 2019-2025 Copyright www.chevtrax.com
