Chevrolet Trax: Vibration diagnostic aids
The diagnostic information contained in this Diagnostic Aids section will help you determine the correct course of action to take for the following 4 main conditions. Refer to the appropriate condition from this list:
- Vibration Diagnostic Aids - Vibration Intermittent or Not Duplicated
- Vibration Diagnostic Aids - Vibration Duplicated, Component Not Identified
- Vibration Diagnostic Aids - Vibration Duplicated, Difficult to Isolate/Balance Component
- Vibration Diagnostic Aids - Vibration Duplicated, Appears to Be Potential Operating Characteristic
VIBRATION DIAGNOSTIC AIDS - VIBRATION INTERMITTENT OR NOT DUPLICATED
NOTE: If you have not completed the Vibration Analysis tables as indicated and reviewed Vibration Diagnostic Aids, refer to Vibration Diagnostic Aids BEFORE proceeding.
If you have not been able to duplicate the vibration concern or have only been able to duplicate the concern intermittently, review the following information.
Most vibration concerns that cannot be duplicated are due to either specific conditions that are not present during the duplicating attempts, or due to not following the procedures designed to duplicate concerns properly and in the sequence indicated.
Specific Conditions Can Affect the Condition
Consider the following conditions which may not have been present while attempts were made to duplicate the vibration concern. Attempt to obtain more specific information from the customer as to the EXACT conditions that are present when they experience the vibration which they are concerned about. Attempt to duplicate the vibration concern again while recreating the EXACT conditions necessary, except those which pose a safety concern or are outside the boundaries of normal operating conditions, such as loading the vehicle beyond its designed weight ratings, etc.
Most attempts to duplicate a vibration concern are made after the vehicle has been driven to the repair facility and perhaps even sat inside the building for a time; the vehicle may be too warm to detect the concern during duplication efforts. The opposite could also occur; perhaps the vehicle has sat out in the cold for a time and fails to reach full operating temperatures during attempts to duplicate the concern.
Temperature, Ground-Out, Accessory Load
Flat Spots on Tires
Tires which have sat and been cool for a time can develop flat spots.
Irregular Wear on Tire Treads
Tires which have sat and been cool for a time will be stiffer and any irregular wear conditions will be more noticeable than they will be once the tires have warmed and softened.
Exhaust System Growth
Exhaust systems may exhibit a ground-out condition when cool which goes away once the system is hot. The opposite may be true that the exhaust system is fine when cool but a ground-out condition occurs once the system reaches operating temperatures. Exhaust systems can grow by 2 1/2 -5 cm (1-2 in) when hot.
Engine-Driven Accessory Noises
NOTE: When a stethoscope equipped with a probe is used to assist in identifying possible vibrating components, the results must be compared to the sound quality of the same accessory, in a equally-equipped, same model year and type, KNOWN GOOD vehicle, and under the same conditions. Refer to Vehicleto- Vehicle Diagnostic Comparison.
A stethoscope equipped with a probe can be used as an additional means to assist in identifying accessories which may be causing or contributing to a vibration concern.
- Belt Whipping
An engine accessory drive belt, or belts could exhibit a whipping condition if a belt is deteriorating and deposits are building up on the underside of the belt.
- Loose Mounting Brackets or Component Ground-Out
Engine-driven accessories such as a generator, a power steering pump, or an air conditioning compressor could exhibit noise conditions due to either loose mounting brackets or due to related components of the system in a ground-out condition during certain operation of that accessory system.
- Cold or Hot
Accessories could exhibit noise conditions when cool which go away once they are fully warmed-up, or the opposite may be true.
- Load on an Accessory Component
Accessories could exhibit a noise condition while under a heavy load - perhaps when combined with a cool or fully warmed-up condition.
- Bent or Misaligned Pulleys
Bent or mis-aligned pulleys in one or more engine-driven accessory systems could contribute to a noise or vibration condition.
- Fluid Level in Accessory Systems
Accessories could exhibit a noise condition due to an abnormal amount of fluid contained in the system of which the accessory is a part. For example:
- An improper power steering fluid level could produce noises in the power steering system.
- An improper air conditioning refrigerant level or an excessive amount of refrigerant oil could produce noises or possibly vibrations in the air conditioning system.
Incorrect Fluid Type in Accessory Systems
Accessories could exhibit a noise condition due to the incorrect type of fluid contained in the system of which the accessory is a part.
Vehicle Payload
The vibration concern may only occur when the vehicle is carrying heavy payloads or towing a trailer; the vehicle may have been empty during duplication efforts.
Heavy Payload
The vehicle may have been empty during attempts to duplicate the vibration concern, but the customer may actually experience the vibration concern while the vehicle is carrying a large payload.
Trailer Towing
The customer may experience the vibration concern only while towing a trailer.
Roadway Selection
The selection of roadways used to perform the vibration duplication procedures is likely to be in the near vicinity of the repair facility and may not provide a road surface that is similar enough to the surface on which the customer usually drives the vehicle.
The customer may only experience the vibration on a particular roadway. Perhaps the roadway is overly crowned or is very bumpy or rough.
VIBRATION DIAGNOSTIC AIDS - VIBRATION DUPLICATED, COMPONENT NOT IDENTIFIED
NOTE: If you have not completed the Vibration Analysis tables as indicated and reviewed Vibration Diagnostic Aids, refer to Vibration Diagnostic Aids BEFORE proceeding.
Aftermarket Add-On Accessories
Aftermarket accessories which have been added to the vehicle can actually transmit and magnify INHERENT component rotational frequencies, if the accessories were not installed correctly.
An accessory should be installed in such a way that it is isolated from becoming a possible transfer path into the rest of the vehicle. For example, if a set of running boards has been installed improperly and they are sensitive to a particular frequency of a rotating component, the running boards could begin to respond to the frequency and actually create a disturbance once the amplitude of the frequency reaches a high enough point , probably at a higher vehicle speed.
If the same set of running boards were installed properly-isolated properly-the transfer path would be removed and the disturbance would no longer be present.
VIBRATION DIAGNOSTIC AIDS - VIBRATION DUPLICATED, DIFFICULT TO ISOLATE/BALANCE COMPONENT
NOTE: If you have not completed the Vibration Analysis tables as indicated and reviewed Vibration Diagnostic Aids, refer to Vibration Diagnostic Aids BEFORE proceeding.
If you have duplicated the vibration concern but have had difficulty in balancing a component or isolating a component, refer to the following information.
Most vibration concerns are corrected or eliminated through correcting excessive runout of a component, correcting balance of a component or isolating a component which has come into abnormal contact with another object/component.
Components which can generate a lot of energy and are experiencing excessive runout, imbalance or ground-out can produce a vibration with a strong enough amplitude that the vibration can transmit to components which are closely related. This type of a condition is usually related to and sensitive to torque-load. The most likely system that could exhibit this type of a condition is the driveline.
VIBRATION DIAGNOSTIC AIDS - VIBRATION DUPLICATED, APPEARS TO BE POTENTIAL OPERATING CHARACTERISTIC
NOTE: If you have not completed the Vibration Analysis tables as indicated and reviewed Vibration Diagnostic Aids, refer to Vibration Diagnostic Aids BEFORE proceeding.
Check Service Bulletins
If BOTH of the following statements are TRUE, then check service bulletins for the condition identified. If the condition has already been identified and investigated prior to this vehicle, and has been determined to be something that is not truly an operating characteristic or that perhaps is not design-intent, there will likely be adjustments or corrections identified which will address the condition.
- You CAREFULLY followed the steps indicated through reviewing the Diagnostic Starting Point - Vibration Diagnosis and completing the Vibration Analysis tables identified and you have duplicated the vibration concern.
- You have come to the conclusion through comparison with a very equally-equipped, same model year and type, KNOWN GOOD vehicle that the customer's concern is a condition that appears to be a potential operating characteristic of the vehicle.
SYMPTOMS - VIBRATION DIAGNOSIS AND CORRECTION
NOTE: Perform the following steps in sequence BEFORE using these symptom tables.
Perform the Vibration Analysis - Road Testing (EL-38792-A Electronic Vibration Analyzer), Vibration Analysis - Road Testing (CH-51450-NVH Oscilloscope) table before using these symptom tables in order to duplicate and effectively diagnose the customer's concern.
Symptom Tables
Refer to a Vibration Analysis table as indicated in the following symptom tables, based on the most dominant characteristic of the customer's vibration concern, felt or heard, that is evident during the appropriate condition of the occurrence.
Vibration Symptoms that are Felt
.jpg)
.jpg)
Vibration Symptoms that are Heard
.jpg)

VEHICLE-TO-VEHICLE DIAGNOSTIC COMPARISON
Comparing the customer vehicle to a KNOWN GOOD vehicle that is essentially identical will help determine if the customer concern may be characteristic of a vehicle design. To arrive at a valid conclusion, the comparison must be performed under the same conditions, using the same criteria, on a vehicle that has the same option content as the customer vehicle.
The comparison vehicle must match the customer's vehicle in the following areas:
- Model Year
- Make
- Model
- Body style
- Powertrain configuration
- Driveline configuration
- Final drive ratio
- Tire/wheel size and type
- Suspension package
- Trailering package
- GVW rating
- Performance options
- Luxury options
TIRE AND WHEEL INSPECTION
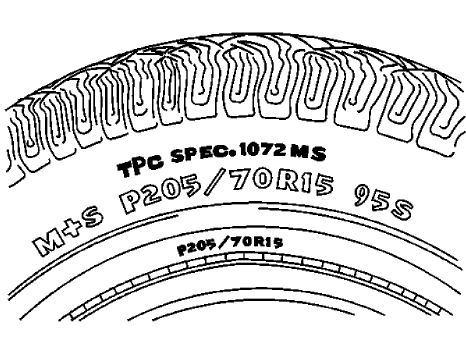
Fig. 2: Identifying Tire Performance Criteria (TPC) Rating Markings
The tires on all new production models have a tire performance criteria (TPC) rating number molded on the sidewall. The TPC rating will appear as a 4-digit number preceded by the letters TPC SPEC on the tire wall near the tire size. A replacement tire should have the same TPC rating.
Tire Wear
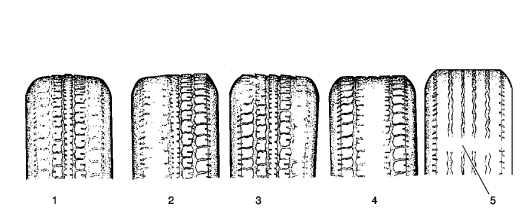
Fig. 3: Identifying Types Of Tire Wear
.jpg)
Inspect the tire and wheel assemblies for the following conditions:
- Unusual wear such as cupping, flat spots, and/or heel-and-toe wear These conditions can cause tire growl, tire howl, slapping noises, and/or vibrations throughout the vehicle.
- Proper inflation to specifications for the vehicle
- Bulges in the sidewalls
Do not confuse bulges, which are an abnormal condition, with normal ply splices which are commonly seen as indentations in the sidewall.
- Bent rim flanges
TIRE AND WHEEL ASSEMBLY RUNOUT MEASUREMENT - ON-VEHICLE
- Raise and support the vehicle.
- Closely inspect each tire for proper and even bead seating.
- If any of the tire beads were not properly or evenly seated, reseat the
tire bead, then proceed to step 4.
Refer to Tire and Wheel Removal and Installation .
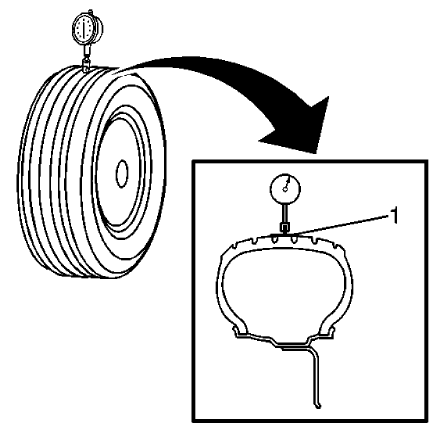
Fig. 4: Measuring Tire & Wheel Assembly Radial Runout
- Wrap the circumference of each tire with tape (1) in the center tread
area.
Wrapping the tread with tape allows for a smooth and accurate reading of radial runout to be obtained.
- Position the dial indicator on the taped portion of the tire tread such that the dial indicator is perpendicular to the tire tread surface.
- Slowly rotate the tire and wheel assembly one complete revolution in order to find the low spot.
- Set the dial indicator to zero at the low spot.
- Slowly rotate the tire and wheel assembly one more complete revolution and measure the total amount of radial runout.
Specification
Maximum tire and wheel assembly radial runout - measured on-vehicle: 1.52 mm (0.060 in)
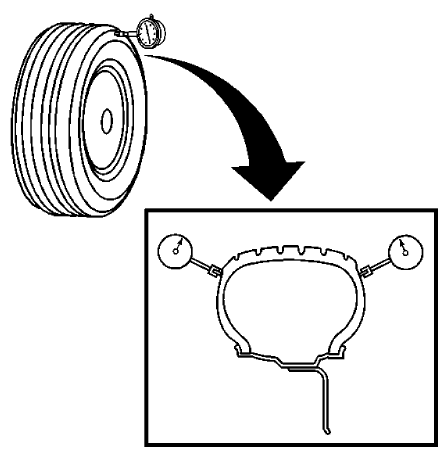
Fig. 5: Measuring Tire & Wheel Assembly Lateral Runout
- Position the dial indicator on a smooth portion of the tire sidewall, as close to the tread as possible, such that the dial indicator is perpendicular to the tire sidewall surface.
- Slowly rotate the tire and wheel assembly one complete revolution in order to find the low spot. Ignore any jumps or dips due to sidewall splices.
- Set the dial indicator to zero at the low spot.
- Slowly rotate the tire and wheel assembly one more complete revolution and measure the total amount of lateral runout. Ignore any jumps or dips due to sidewall splices and attain an average runout measurement.
Specification
Maximum tire and wheel assembly lateral runout - measured on-vehicle: 1.52 mm (0.060 in)
- Repeat steps 4-12 until all of the tire and wheel assembly radial and lateral runout measurements have been taken.
- Lower the vehicle.
TIRE AND WHEEL ASSEMBLY RUNOUT MEASUREMENT - OFF VEHICLE
- Raise and support the vehicle.
- Mark the location of the wheels to the wheel studs and mark the specific vehicle position on each tire and wheel - LF, LR, RF, RR.
- Remove the tire and wheel assemblies from the vehicle.
- Closely inspect each tire for proper and even bead seating.
- If any of the tire beads were not properly or evenly seated, reseat the
tire bead, then proceed to step 6.
Refer to Tire and Wheel Removal and Installation .
- Mount a tire and wheel assembly on a spin-type wheel balancer.
Locate the tire and wheel assembly on the balancer with a cone through the back side of the center pilot hole.
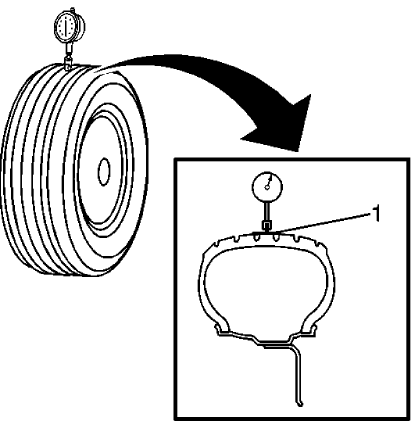
Fig. 6: Measuring Tire & Wheel Assembly Radial Runout
Courtesy of GENERAL MOTORS COMPANY
- Wrap the outer circumference of each tire with tape (1) in the center
tread area.
Wrapping the tread with tape allows for a smooth and accurate reading of radial runout to be obtained.
- Position the dial indicator on the taped portion of the tire tread such that the dial indicator is perpendicular to the tire tread surface.
- Slowly rotate the tire and wheel assembly one complete revolution in order to find the low spot.
- Set the dial indicator to zero at the low spot.
- Slowly rotate the tire and wheel assembly one more complete revolution and measure the total amount of radial runout.
Specification
Maximum tire and wheel assembly radial runout - measured off-vehicle: 1.27 mm (0.050 in)
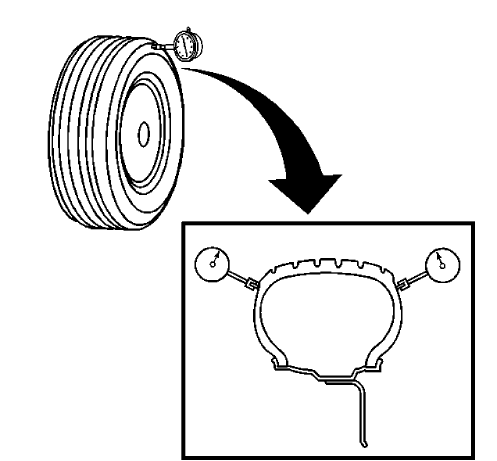
Fig. 7: Measuring Tire & Wheel Assembly Lateral Runout
Courtesy of GENERAL MOTORS COMPANY
- Position the dial indicator on a smooth portion of the tire sidewall, as close to the tread as possible, such that the dial indicator is perpendicular to the tire sidewall surface.
- Slowly rotate the tire and wheel assembly one complete revolution in order to find the low spot. Ignore any jumps or dips due to sidewall splices.
- Set the dial indicator to zero at the low spot.
- Slowly rotate the tire and wheel assembly one more complete revolution and measure the total amount of lateral runout. Ignore any jumps or dips due to sidewall splices and attain an average runout measurement.
Specification
Maximum tire and wheel assembly lateral runout - measured off-vehicle: 1.27 mm (0.050 in)
- Repeat steps 6-15 until all of the tire and wheel assembly radial and lateral runout measurements have been taken.
- If ANY of the tire and wheel assembly runout measurements were NOT within specifications, proceed to step 19.
- If ALL of the tire and wheel assembly runout measurements WERE within specifications, then the offvehicle tire and wheel assembly runout is considered acceptable.
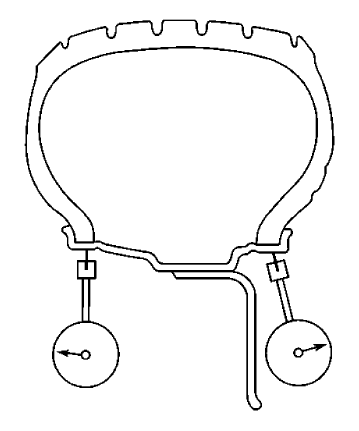
Fig. 8: Measuring Wheel Radial Runout (Off-Vehicle, Tire Mounted)
- Position the dial indicator on the horizontal outer surface of the wheel
rim flange - with the tire still
mounted - such that the dial indicator is perpendicular to the rim flange
surface.
Wheel runout should be measured on both the inboard and outboard rim flanges, unless wheel design will not permit. Ignore any jumps or dips due to paint drips, chips, or welds.
- Slowly rotate the tire and wheel assembly one complete revolution in order to find the low spot.
- Set the dial indicator to zero at the low spot.
- Slowly rotate the tire and wheel assembly one more complete revolution and measure the total amount of wheel radial runout.
Specification
- Maximum aluminum wheel radial runout - measured off-vehicle, tire mounted: 0.762 mm (0.030 in)
- Maximum steel wheel radial runout - measured off-vehicle, tire mounted: 1.015 mm (0.040 in)
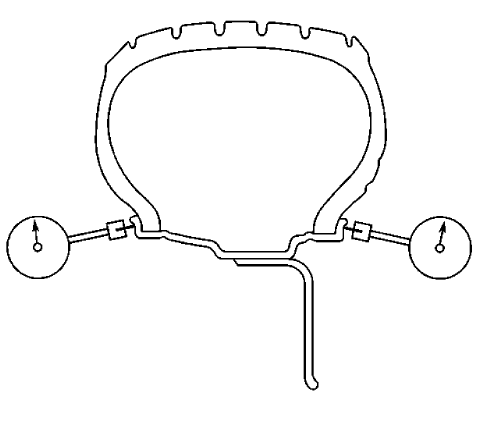
Fig. 9: Measuring Wheel Lateral Runout (Off-Vehicle, Tire Mounted)
- Position the dial indicator on the vertical outer surface of the wheel
rim flange - with the tire still mounted
- such that the dial indicator is perpendicular to the rim flange surface.
Wheel runout should be measured on both the inboard and outboard rim flanges, unless wheel design will not permit. Ignore any jumps or dips due to paint drips, chips, or welds.
- Slowly rotate the tire and wheel assembly one complete revolution in order to find the low spot.
- Set the dial indicator to zero at the low spot.
- Slowly rotate the tire and wheel assembly one more complete revolution and measure the total amount of wheel lateral runout.
Specification
- Maximum aluminum wheel lateral runout - measured off-vehicle, tire mounted: 0.762 mm (0.030 in)
- Maximum steel wheel lateral runout - measured off-vehicle, tire mounted: 1.143 mm (0.045 in)
- Repeat steps 19-26 until all of the wheel radial and lateral runout measurements have been taken on each of the - tire and wheel - assemblies with assembly runout measurements which were NOT within specifications.
- If any of the wheel runout measurements were NOT within specifications, proceed to Measuring Wheel Runout - Tire Dismounted.
- For any of the wheel runout measurements which WERE within specifications, while the - tire and wheel - assembly runout measurements were NOT within specifications, replace the tire, then balance the assembly. Refer to Tire and Wheel Assembly Runout Measurement - Off Vehicle.
- After replacement of any tires, always re-measure the runout of the affected tire and wheel assembly, or assemblies.
- Using the matchmarks made prior to removal, install the tire and wheel assemblies to the vehicle.
- Lower the vehicle.
Wheel Runout Measurement - Tire Dismounted
- On the tire and wheel assembly, or assemblies with wheel runout measurements - tire mounted - which were NOT within specifications, mark each tire and wheel in relation to each other.
- Dismount the tire from the wheel. Refer to Tire Dismounting and Mounting .
- Mount the wheel on a spin-type wheel balancer.
- Locate the wheel on the balancer with a cone through the back side of the center pilot hole.
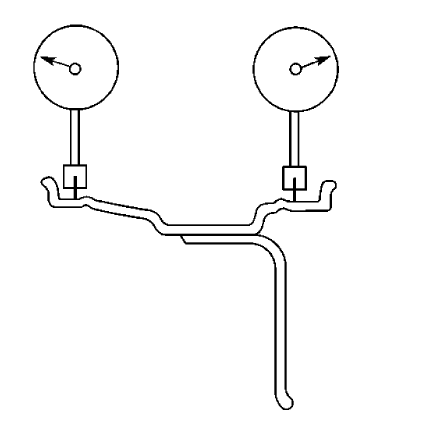
Fig. 10: Measuring Wheel Radial Runout (Off-Vehicle, Tire Dismounted)
- Position the dial indicator on the horizontal inner surface of the wheel
rim flange - with the tire
dismounted - such that the dial indicator is perpendicular to the rim flange
surface.
Wheel runout should be measured on both the inboard and outboard rim flanges. Ignore any jumps or dips due to paint drips, chips, or welds.
- Slowly rotate the wheel one complete revolution in order to find the low spot.
- Set the dial indicator to zero at the low spot.
- Slowly rotate the wheel one more complete revolution and measure the total amount of wheel radial runout.
Specification
- Maximum aluminum wheel radial runout - measured off-vehicle, tire dismounted: 0.762 mm (0.030 in)
- Maximum steel wheel radial runout - measured off-vehicle, tire dismounted: 1.015 mm (0.040 in)
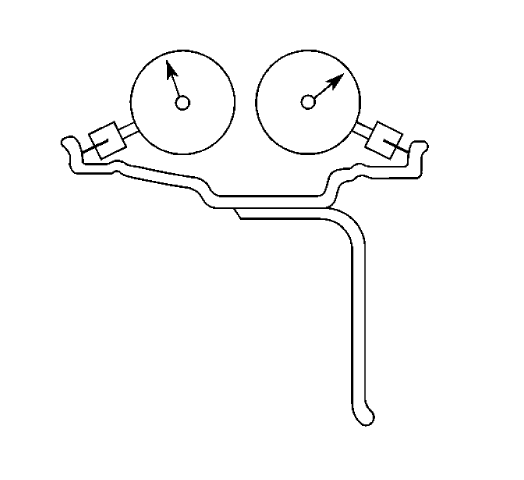
Fig. 11: Measuring Wheel Lateral Runout (Off-Vehicle, Tire Dismounted)
- Position the dial indicator on the vertical inner surface of the wheel
rim flange - with the tire dismounted -
such that the dial indicator is perpendicular to the rim flange surface.
Wheel runout should be measured on both the inboard and outboard rim flanges. Ignore any jumps or dips due to paint drips, chips, or welds.
- Slowly rotate the wheel one complete revolution in order to find the low spot.
- Set the dial indicator to zero at the low spot.
- Slowly rotate the wheel one more complete revolution and measure the total amount of wheel lateral runout.
Specification
- Maximum aluminum wheel lateral runout - measured off-vehicle, tire dismounted: 0.762 mm (0.030 in)
- Maximum steel wheel lateral runout - measured off-vehicle, tire dismounted: 1.143 mm (0.045 in)
- Repeat steps 2-12 until all of the wheel radial and lateral runout measurements - tire dismounted - have been taken on each wheel with runout measurements - tire mounted - which were NOT within specifications.
- If any of the wheel runout measurements - tire dismounted - were NOT within specifications, replace the wheel.
Always measure the runout of any replacement wheels.
- For any of the wheel runout measurements which WERE within specifications, while the - tire and wheel - assembly runout measurements were NOT within specifications, replace the tire, then balance the assembly. Refer to Tire and Wheel Assembly Runout Measurement - Off Vehicle.
- Using the matchmarks made prior to dismounting the tire, or tires, mount the tire, or tires to the wheel, or wheels, then balance the assembly, or assemblies. Refer to Tire and Wheel Assembly Runout Measurement - Off Vehicle.
Always measure the runout of any of the tire and wheel assemblies which have had the tires dismounted and mounted.
- Using the matchmarks made prior to removal, install the tire and wheel assemblies to the vehicle.
- Lower the vehicle.

