Chevrolet Trax: Front wheel drive shaft replacement - right side
Special Tools
J 45859 Hub Spindle Remover
Fro regional special tools, refer to Special Tools.
Removal Procedure
- Raise and support the vehicle. Refer to Lifting and Jacking the Vehicle .
- Remove the tire and wheel assembly. Refer to Tire and Wheel Removal and Installation .
.gif)
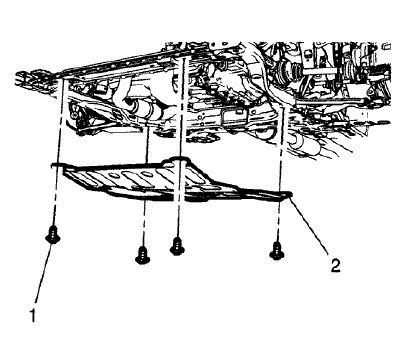
Fig. 17: Front Suspension Skid Plate And Bolts
- Remove the front compartment front center insulator (2), if equipped. Refer to Front Compartment Front Center Insulator Replacement .
.gif)
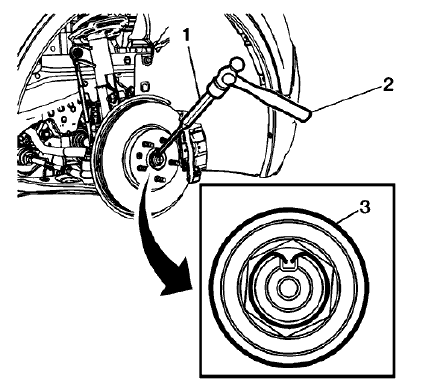
Fig. 18: Removing Stake From Wheel Drive Shaft Nut
- Using a suitable tool (2) and a hammer (3), remove the stake from the wheel drive shaft nut (1).
.gif)
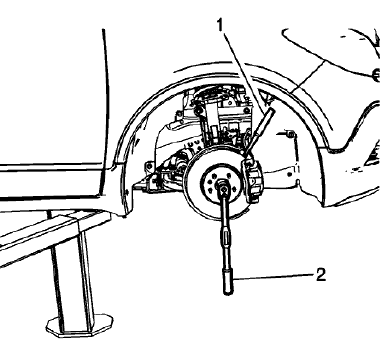
Fig. 19: Inserting Drift Or Punch In Brake Rotor Cooling Vanes
- Insert a drift or punch (1) in the cooling vanes of the brake rotor.
- Using a breaker bar and the proper size socket (2), loosen the wheel drive shaft nut.
.gif)
Fig. 20: Wheel Drive Shaft Nut
- Remove and discard the wheel drive shaft nut (1). Replace with NEW only.
- Remove and relocate the front brake caliper assembly. Refer to Front Brake Caliper Replacement
.gif)
Fig. 21: Wheel Drive Shaft Removal Tool
- Using the J-45859 remover (1), separate the wheel drive shaft from the front wheel bearing/hub assembly.
- Remove the stabilizer shaft link from the front strut. Refer to Stabilizer Shaft Link Replacement .
- Remove the outer tie rod end from the steering knuckle. Refer to Steering Linkage Outer Tie Rod Replacement .
- Remove the lower control arm bolt from the steering knuckle. Refer to Lower Control Arm Replacement .
.gif)
Fig. 22: Removing Wheel Drive Shaft
- Using a long screw driver (1) and using mounting bracket (3) ,for leverage. Apply force against the inner tripot joint to remove the wheel drive shaft (2) from the transfer case or the intermediate drive shaft.
.gif)
Fig. 23: Wheel Drive Shaf
- Remove the wheel drive shaft (1) from the vehicle.
.gif)
Fig. 24: Wheel Drive Shaft And Washer
NOTE: If there is no washer on the wheel drive shaft, install a NEW washer.
- Remove and discard the washer (1) from the wheel drive shaft (2). Do not re-use the washer, replace with NEW only.
Installation Procedure
.gif)
Fig. 25: Wheel Drive Shaft
- Install the wheel drive shaft (1) until it is fully seated in the transfer case.
- Install the wheel drive shaft to the front wheel hub/bearing.
- Install the lower control arm ball joint bolt to the steering knuckle. Refer to Lower Control Arm Replacement .
- Install the stabilizer shaft link to the front strut. Refer to Stabilizer Shaft Link Replacement .
- Install the outer tie rod to the steering knuckle. Refer to Steering Linkage Outer Tie Rod Replacement .
- Install the front brake caliper assembly. Refer to Front Brake Caliper Replacement
.gif)
Fig. 26: Wheel Drive Shaft Nut
- Install the NEW wheel drive shaft nut (1) to the wheel drive shaft.

Fig. 27: Inserting Drift Or Punch In Brake Rotor Cooling Vanes
- Insert a drift or punch (1) in the cooling fins of the brake rotor.
CAUTION: Refer to Fastener Caution .
- Using the proper size socket and torque wrench (2), install the NEW wheel drive shaft.
Tighten
- First Pass 50 (37 lb ft)
- Final Pass plus 60 degrees

Fig. 28: Splitting Center Of Wheel Drive Shaft Nut
NOTE: Evenly split the center of the wheel drive shaft nut (3) and ensure that it is fully staked. Each side of the stake should be in contact and approximately 45 degrees to each side of the slot in the wheel drive shaft.
- Using the punch (1) and the hammer (2), stake the wheel drive shaft nut (3) collar into the slot on the wheel drive shaft.

Fig. 29: Front Suspension Skid Plate And Bolts
- Install the splash shield cover (2), if equipped.
- Install the tire and wheel assembly. Refer to Tire and Wheel Removal and Installation .
- Remove the support and lower the vehicle.

