Chevrolet Trax: Steering angle sensor replacement
.gif)
Fig. 7: View Of Steering Angle Sensor
Steering Angle Sensor Replacement
.jpg)
STEERING ANGLE SENSOR CENTERING
The steering angle sensor does not require centering often. Centering of the steering angle sensor might be required after certain service procedures are performed. Some of these procedures are as follows:
- Wheel alignment
- Steering gear replacement
- Steering column replacement
- Collision or other physical damage
- Steering angle sensor replacement
- Electronic brake control module (EBCM) replacement
The steering angle sensor centering procedure can be completed with a scan tool using the following steps:
- Using the steering wheel, align the front wheels forward.
- Apply the parking brake, or set the transmission in the Park.
- Install the scan tool to the data link connector.
- Turn the ignition ON, and the engine OFF.
- Select Steering Wheel Angle Sensor Reset in the Steering Wheel Angle Sensor Module Control Functions list.
- Follow the scan tool directions to complete the reset procedure.
- Select Steering Wheel Angle Sensor Learn in the Steering Wheel Angle Sensor Module Functions list.
- Follow the scan tool directions to complete the learn procedure.
- Clear any DTCs that may be set.
Electronic brake control module replacement
Removal Procedure
WARNING: Refer to Brake Fluid Irritant Warning .
CAUTION: Refer to Brake Fluid Effects on Paint and Electrical Components Caution
- Remove the battery tray. Refer to Battery Tray Replacement .
- Without disconnecting the brake pipes, remove the electronic brake control module (EBCM) with the brake pressure modulator valve (BPMV) and bracket as an assembly. Refer to Brake Pressure Modulator Valve Replacement.
- Carefully position aside the assembly and secure with heavy mechanics wire.
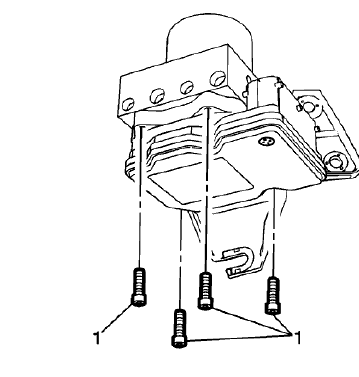
Fig. 8: EBCM Bolts
- Remove the EBCM bolts (1),
.gif)
Fig. 9: Electronic Brake Control Module
NOTE: Do not pry the components apart.
- Carefully separate the EBCM (1) from the BPMV.
- Clean the sealing surfaces of the EBCM and the BPMV with denatured alcohol and allow to dry.
Installation Procedure
.gif)
Fig. 10: Electronic Brake Control Module
- Install the EBCM (1) to the BPMV.
.gif)
Fig. 11: EBCM Bolts
CAUTION: Refer to Fastener Caution .
- Install the EBCM bolts (1) and tighten to 3 N.m (26 lb in).
- Install the BPMV with EBCM and bracket assembly. Refer to Brake Pressure Modulator Valve Replacement.
- Install the battery tray. Refer to Battery Tray Replacement .
- Program the EBCM. Refer to Electronic Brake Control Module Programming and Setup .
