Chevrolet Trax: Piston and connecting rod assemble
Special Tools
EN-49941 Remover / Installer Piston Retainer Ring
For equivalent regional tools, refer to Special Tools.
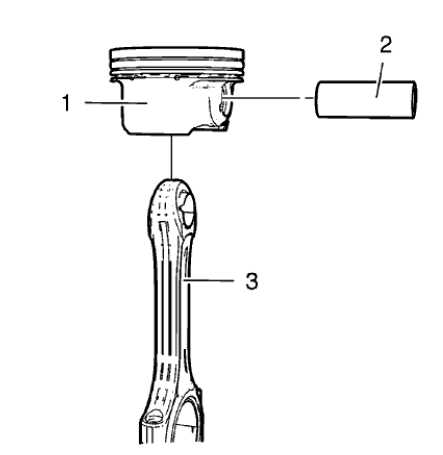
Fig. 345: Connecting Rod, Piston And Piston Pin
NOTE: Lubricate the piston pin with clean engine oil.
- Install the connecting rod (3) and the piston pin (2) to the piston (1).
- Install the piston and connecting rod assembly to a bench vise. Use aluminium braces.
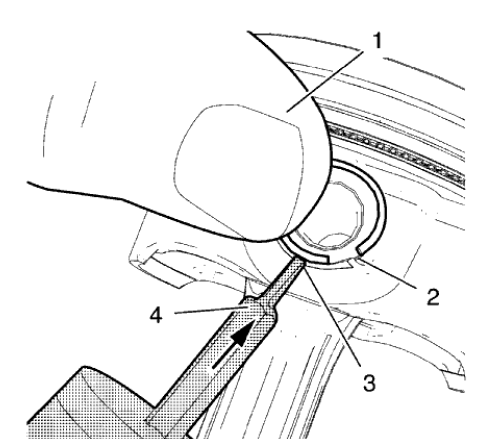
Fig. 346: Pushing Piston Pin Retainer Down With Thumb
WARNING: Use extreme care when removing snap rings. Always wear adequate eye protection in order to avoid personal injury.
WARNING: Use care when removing or installing the piston retainer ring.
Ensure the EN-49941 remover/installer is installed properly onto the retainer ring and that hands and fingers are kept clear from the front of the tool. Otherwise, bodily injury may occur.
NOTE: Notch (2) on right side.
- Place the piston pin retainer in the piston pin retainer groove so that the ring gap lays on the notch (2).
- Push the piston pin retainer down with the thumb in the shown position (1) and hold.
NOTE: The EN-49941 installer should be applied in a perpendicular position to the piston pin retainer.
- Apply the EN-49941 installer (4) to the piston pin retainer in the position shown (3) and push in direction of the arrow while pushing down with the thumb.
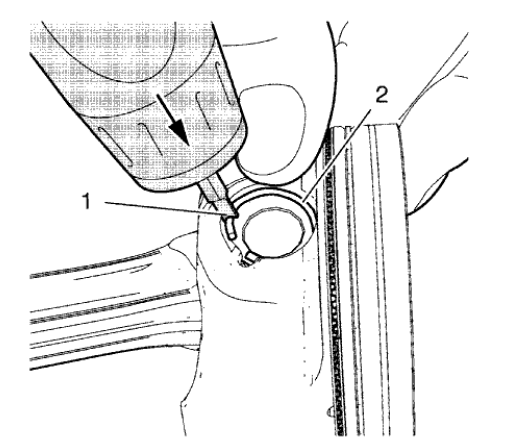
Fig. 347: Pushing Piston Pin Retainer Down
NOTE: Push the piston pin retainer down in the position shown (2).
- Move the EN-49941 installer (1) carefully to the position shown while pushing in direction of the arrow until the piston pin retainer engages in the piston pin retainer groove.
- Push down the piston ring retainer to get a proper seat in the groove.
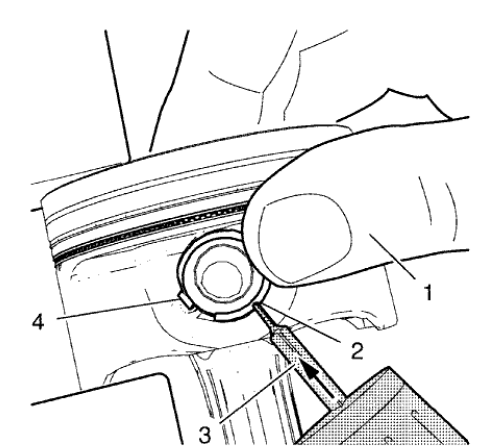
Fig. 348: Pushing Piston Pin Retainer Down With Thumb
NOTE: Notch (4) on left side. EN-49941 installer should be used with left hand.
- Place the piston pin retainer in the piston pin retainer groove so that the ring gap lays on the notch (4).
- Push the piston pin retainer down with the thumb in the position shown (1) and hold.
NOTE: The EN-49941 installer should be applied in a perpendicular position to the piston pin retainer.
- Apply the EN-49941 installer (3) to the piston pin retainer in the position shown (2) and push in direction of the arrow while pushing down with the thumb.

Fig. 349: Pushing Piston Pin Retainer Down
NOTE: Push the piston pin retainer down in the position shown (1).
- Move the EN-49941 installer (2) carefully to the position shown while pushing in direction of the arrow until the piston pin retainer engages in the piston pin retainer groove.
- Push down the piston ring retainer to get a proper seat in the groove.
- Remove the piston and connecting rod assembly from the bench vise.

Fig. 350: Using Piston Ring Pliers
- Install the piston rings. Use piston ring pliers (1).
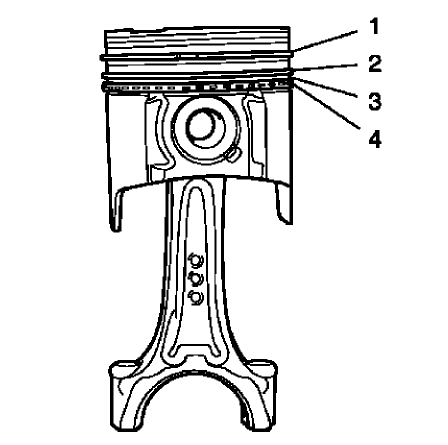
Fig. 351: Upper Compression Ring, Lower Compression Ring, Oil Rings And Oil
Ring Spacer
NOTE: Mind the TOP marking on the piston rings.
- The piston rings must be ordered as followed:
- Upper compression ring (1)
- Lower compression ring (2)
- Piston oil ring with spacer (3), (4)
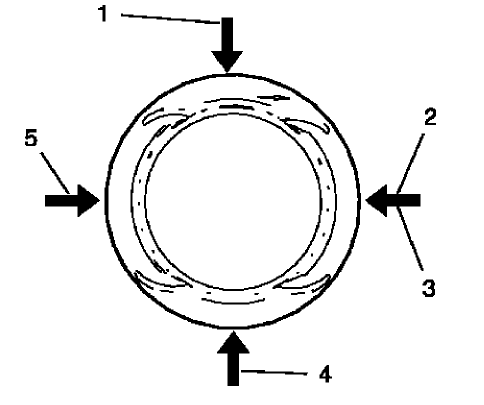
Fig. 352: Oil Ring Joints, Lower Compression Ring Joint, Upper Compression
Ring Joint And Oil Ring Spacer Joint
- The piston ring joints must be positioned 90 degrees to each other.
- Upper compression ring joint (2)
- Lower compression ring joint (5)
- Oil ring joint, upper part (1)
- Oil ring joint, lower part (4)
- Oil ring spacer joint (3)
INTAKE MANIFOLD DISASSEMBLE
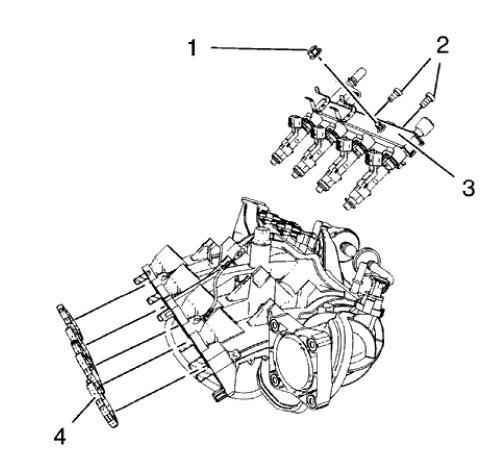
Fig. 353: Fuel Injection Fuel Rail Assembly And Intake Manifold Gasket
- Remove the fuel injection rail ground cable nut (1).
- Remove the 2 fuel injection rail bolts (2).
- Remove the fuel injection fuel rail assembly (3).
- Remove the intake manifold gasket (4).
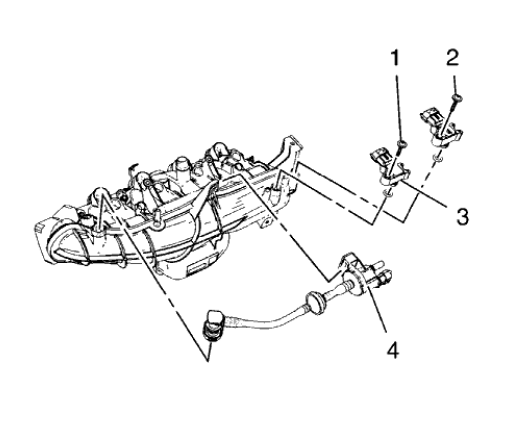
Fig. 354: Evaporative Emission Canister Purge Solenoid Valve And Manifold
Absolute Pressure Sensors
- Remove the 2 manifold absolute pressure sensor bolts (1).
- Remove the 2 manifold absolute pressure sensors (2).
- Remove the evaporative emission canister purge solenoid valve (3).
INTAKE MANIFOLD CLEANING AND INSPECTION
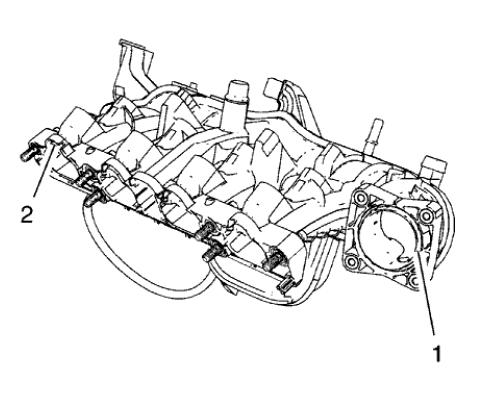
Fig. 355: Sealing Surfaces
- Clean the sealing surfaces (1) and (2).
- Inspect the intake manifold for cracks and fractures.
INTAKE MANIFOLD ASSEMBLE
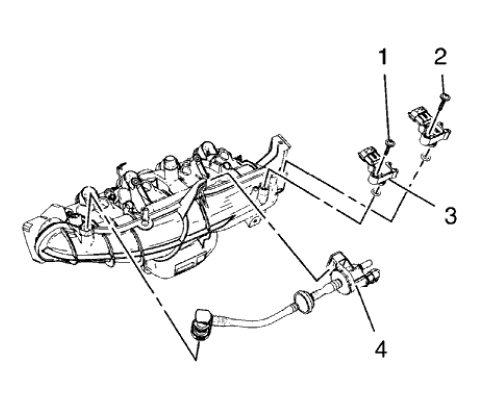
Fig. 356: Evaporative Emission Canister Purge Solenoid Valve And Manifold
Absolute Pressure Sensors
- Install the evaporative emission canister purge solenoid valve (3).
- Install the 2 manifold absolute pressure sensors (2).
- Install the 2 manifold absolute pressure sensor bolts (1) and tighten.
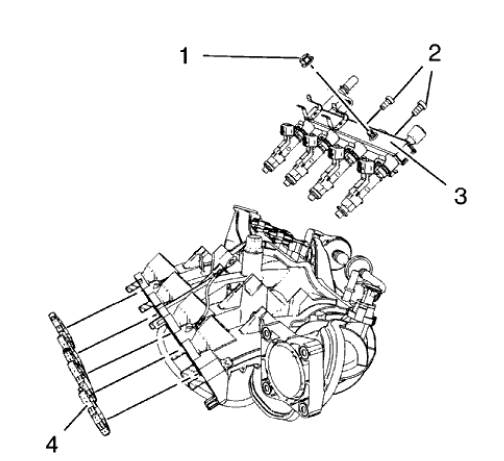
Fig. 357: Fuel Injection Fuel Rail Assembly And Intake Manifold Gasket
- Install the fuel injection fuel rail assembly (3).
CAUTION: Refer to Fastener Caution .
- Install the 2 fuel injection rail bolts (2) and tighten to 8 N.m (71 lb in).
- Install the fuel injection rail ground cable nut (1) and tighten.
- Install a NEW intake manifold gasket (4).
READ NEXT:
 Crankshaft and bearing cleaning and inspection
Special Tools
EN-470-B Angular Torque Wrench
GE-571-B Dial Gauge
For equivalent regional tools, refer to Special Tools.
Crankshaft End Play, Check
Fig. 358: Gauge Tool
NOTE: Crankshaft attached
Engine front cover and oil pump cleaning and inspection
Engine Front Cover Cleaning Procedure
Clean the engine front cover sealing surface.
Fig. 366: Oil Gallery Bores
WARNING: Wear safety glasses when using compressed air in order to
prevent
eye inj
Crankshaft and bearing installation
Special Tools
EN-235-6 Installer from EN-235-D Kit.
EN-470-B Angular Torque Wrench
EN-658-1 Installer from EN-658 Kit
For equivalent regional tools, refer to Special Tools.
Lubricate crankshaft
SEE MORE:
Fuel tank draining
Special Tool
CH 45004 Fuel Tank Drain Hose
WARNING: Never drain or store fuel in an open container. Always use
an approved
fuel storage container in order to reduce the chance of fire or explosion.
WARNING: Place a dry chemical (Class B) fire extinguisher nearby
before performing
any on-vehicle se
DTC U0078: Control module communication low speed can bus off
Diagnostic Instructions
Perform the Diagnostic System Check - Vehicle prior to using this
diagnostic procedure.
Review Strategy Based Diagnosis for an overview of the diagnostic
approach.
Diagnostic Procedure Instructions provides an overview of each
diagnostic category.
DTC Descriptor
DT
