Chevrolet Trax: Input and output speed sensor removal
.gif)
Fig. 6: View Of Input & Output Speed Sensor
Input and Output Speed Sensor Removal
.jpg)
TORQUE CONVERTER HOUSING WITH FLUID PUMP ASSEMBLY REMOVAL (NON HYBRID)
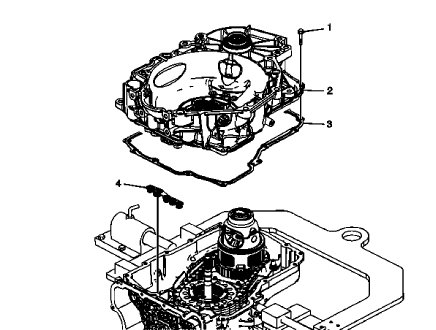
Fig. 7: View Of Torque Converter Housing & Fluid Pump Assembly
Torque Converter Housing with Fluid Pump Assembly Removal (Non Hybrid)
.jpg)
DIFFERENTIAL CARRIER REMOVAL (6T40)
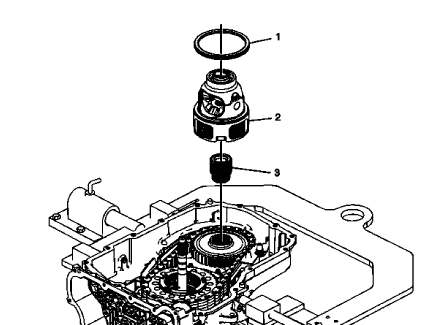
Fig. 8: View Of Front Differential Carrier Assembly
Differential Carrier Removal (6T40)
.jpg)
DRIVE AND DRIVEN SPROCKET, DRIVE LINK, AND PARK PAWL REMOVAL (6T40)

Fig. 9: View Of Drive and Driven Sprocket, Drive Link & Park Pawl
Drive and Driven Sprocket, Drive Link, and Park Pawl Removal (6T40)
.jpg)
.gif)
INTERNAL COMPONENTS REMOVAL
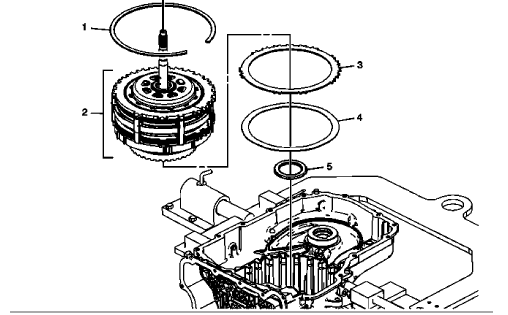
Fig. 10: View Of Transmission Internal Components
Internal Components Removal
.jpg)
.jpg)
2-6 CLUTCH PISTON REMOVAL
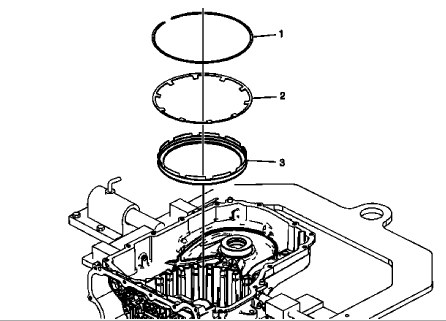
Fig. 11: View Of 2-6 Clutch Piston & Attached Components
2-6 Clutch Piston Removal
.jpg)
.jpg)
MANUAL SHIFT DETENT LEVER WITH SHAFT POSITION SWITCH ASSEMBLY AND PARK PAWL ACTUATOR REMOVAL
Manual Shaft Detent (w/Shift Position Switch) Lever Assembly Removal
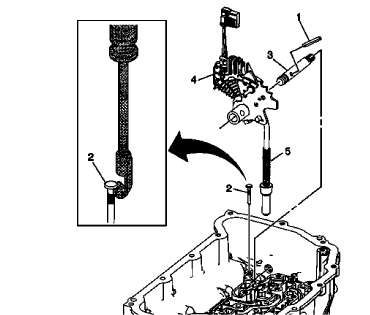
Fig. 12: Identifying Manual Shaft Detent Lever Assembly
Manual Shaft Detent (w/Shift Position Switch) Lever Assembly Removal
.jpg)
.jpg)
Park Pawl Actuator Guide Removal
.gif)
Fig. 13: Identifying Park Pawl Actuator Guide Components
Park Pawl Actuator Guide Removal
.jpg)
.jpg)
Manual shift shaft seal removal
.gif)
Fig. 14: identifying Manual Shift Shaft Seal
Manual Shift Shaft Seal Removal
.jpg)
INPUT SHAFT SUPPORT REPLACEMENT (GEN 2)
.gif)
Fig. 15: Input Shaft Support Components (Gen 2)
Input Shaft Support Replacement (Gen 2)
.jpg)
3-5-REVERSE AND 4-5-6 CLUTCH FLUID SEAL RING REPLACEMENT (GEN 2)
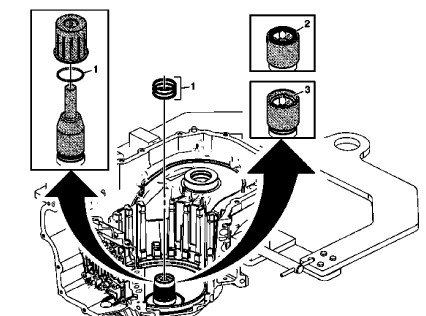
Fig. 16: 3-5-Reverse and 4-5-6 Clutch Fluid Seal Ring (Gen 2)
3-5-Reverse and 4-5-6 Clutch Fluid Seal Ring Replacement (Gen 2)
.jpg)
.jpg)
READ NEXT:
 Front wheel drive shaft seal replacement - case side
Fig. 17: View Of Case Side Front Wheel Drive Shaft Seal
Front Wheel Drive Shaft Seal Replacement - Case Side
TRANSMISSION CASE CLEANING AND INSPECTION
Fig. 18: Cleaning & Inspecting Transmis
Input, reaction, and output carrier disassemble
Fig. 24: Disassembled View Of Input, Reaction & Output Carrier
Courtesy of GENERAL MOTORS COMPANY
Input, Reaction, and Output Carrier Disassemble
3-5-REVERSE AND 4-5-6 CLUTCH HOUSING DISASSEMB
Low and reverse and 1-2-3-4 clutch housing isassemble
Low and Reverse Clutch Piston Removal
Fig. 39: View Of Low & Reverse Clutch Piston
Low and Reverse Clutch Piston Removal
1-2-3-4 Clutch Piston Removal
Fig. 40: View Of 1-2-3-4 Clutch Pisto
SEE MORE:
Additional Maintenance and Care
Your vehicle is an important
investment and caring for it properly
may help to avoid future costly
repairs. To maintain vehicle
performance, additional
maintenance services may be
required.
It is recommended that your dealer
perform these services - their
trained dealer technicians know
your vehicl
Rear side door replacement
Fig. 9: View Rear Side Door
Rear Side Door Replacement
FRONT FENDER REPLACEMENT
Fig. 10: Front Fender
Front Fender Replacement
LIFTGATE ADJUSTMENT (TRAX)
Fig. 11: Liftgate Adjustment Points
Liftgate Adjustment (Trax)
LIFTGATE ADJUSTMENT (ENCORE)
Fig. 12: Liftgate Adjustment Point
