Chevrolet Trax: Immobilizer - Repair instructions
THEFT DETERRENT MODULE REPLACEMENT (ENCORE)
Fig. 3: Theft Deterrent Module (Encore)
Theft Deterrent Module Replacement (Encore)
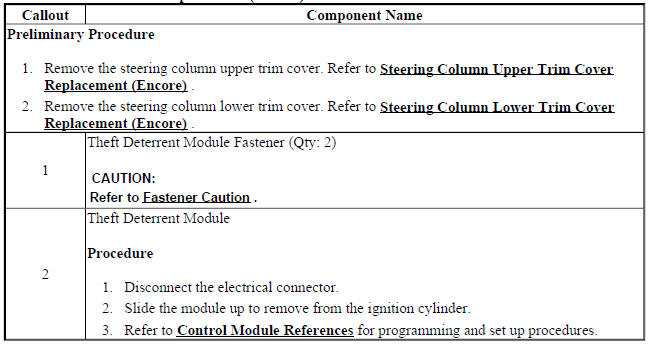
THEFT DETERRENT MODULE REPLACEMENT (TRAX)
Fig. 4: Theft Deterrent Module
Theft Deterrent Module Replacement (Trax)
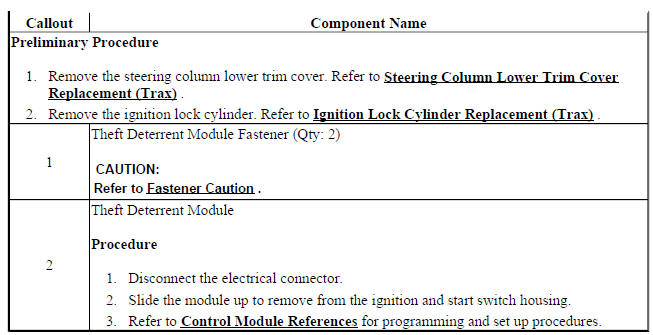
IMMOBILIZER SYSTEM COMPONENT PROGRAMMING
This procedure will learn the immobilizer function. If the battery voltage is low, charge the battery before proceeding with the learn. If the body control module (BCM) or engine control module (ECM) have been replaced, they must be programmed before performing this learn procedure.
Depending on the immobilizer function being learned or the component replaced, different learn functions are required to be performed. These learn functions are as follows:
Immobilizer System Component Programming
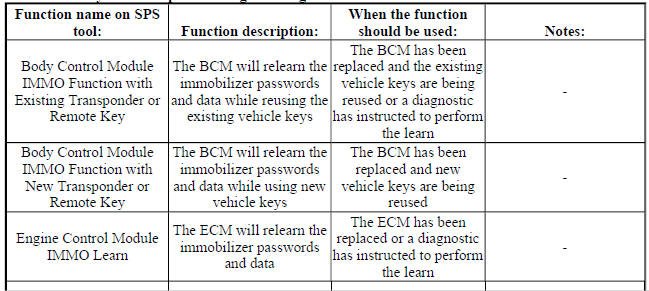
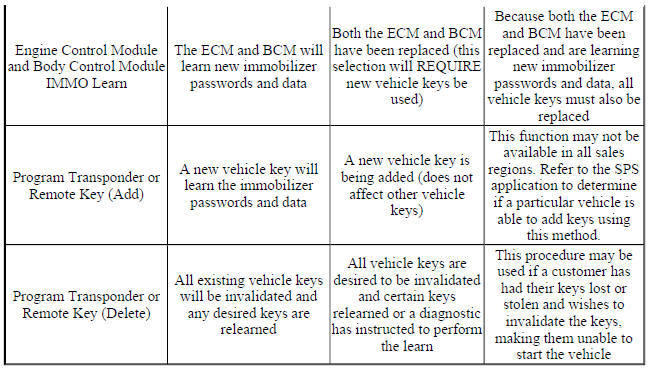
- Connect a scan tool to the vehicle and access SPS.
- Turn ON the ignition, with the engine OFF.
- Ensure that all power consuming devices are turned OFF on the vehicle.
- Select SPS application and follow the on-screen instructions.
- Select Reprogram ECU.
- Select IMMO Immobilizer Learn - Setup.
- Select the appropriate programming function based on the component that was replaced or is being programmed. Refer to the table at the top of this document for assistance in choosing the correct programming function.
- Follow the on-screen instructions.
- After programming all keys "Programming Complete" is displayed.
- Press the lock and unlock button on each transmitter that was programmed. This will awaken each transmitter and allow keyless entry functions to be established.
- With a scan tool, clear any DTCs.
- Verify each key is operating properly. Operate each of the keyless entry functions using the buttons on the transmitter and then start the vehicle. When verifying operation, make sure that no other keys are near the vehicle.
KEY WITH INTEGRATED TRANSMITTER PROGRAMMING
Keys can be programming in various ways using the procedures outlined below. Using the Replacing Keys procedures will first erase all the known keys from the vehicle. Any existing keys and any new keys will then be programmed. This procedure should be used any time a key is required to be unlearned or erased from a vehicle. If a new key is being learned to a vehicle to replace a damaged, inoperative, or stolen key, the Replacing Keys procedure must be used. This ensures that the old key cannot be used to access or start the vehicle after programming.
The Adding Keys procedure does not erase any keys prior to programming. The procedure will simply program the key into the next available slot. The Adding Keys procedure should only be used when adding an additional key to the vehicle. The Adding Keys procedure should never be used to program a key to a vehicle that is having a key replaced, regardless of the cause for the replacement.
Replacing Keys (With SPS)
NOTE:
- This procedure may be used with or without existing learned keys being present.
- A total of eight keys maybe be learned to a single vehicle.
- This procedure will only learn the vehicle key information. This procedure will not learn any immobilizer information between the body control module (BCM) and engine control module (ECM).
- If the battery voltage is low, charge the battery before continuing with the procedure.
- Connect a scan tool to the vehicle and access SPS.
- Ensure that all power consuming devices are turned OFF on the vehicle.
- Select the SPS application and follow the on-screen instructions.
- Select Reprogram ECU.
- Select IMMO Immobilizer Learn - Setup.
- Select the Program Transponder or Remote Key (Delete) function.
- Follow the on-screen instructions.
- After programming all keys, "Programming Complete" is displayed.
- Press the lock and unlock button on each key that was programmed. This will awaken each key and allow keyless entry functions to be established.
- With a scan tool, clear any DTCs.
- Verify each key is operating properly. Operate each of the keyless entry functions using the buttons on the key and then start the vehicle. When verifying operation, make sure that no other keys are near the vehicle.
Replacing Keys (Without SPS) - United States only
NOTE:
- This procedure should be used without existing learned keys being present.
- A total of eight keys maybe be learned to a single vehicle.
- This procedure will only learn the vehicle key information. This procedure will not learn any immobilizer information between the body control module (BCM) and engine control module (ECM).
- If the battery voltage is low, charge the battery before continuing with the procedure.
- With an unlearned master vehicle key, turn ON the ignition, with the engine OFF.
- Observe the security indicator, after approximately 10 min the indicator will turn off.
- Turn OFF the ignition and wait 5 s.
- Repeat steps 1 - 3 two more times for a total of 3 cycles or 30 min.
NOTE: The body control module learns the key transponder information upon the ignition transition from OFF to ON. You must turn the ignition OFF before attempting to start the vehicle.
- Start the vehicle. The vehicle has now learned the key transponder information.
- Additional keys may be learned using the Adding Keys procedure.
- Clear all DTCs.
Adding Keys (Without SPS) - North America, except Canada
NOTE:
- To initiate, this procedure requires that 1 learned key be available.
- A total of eight keys maybe be learned to a single vehicle.
- This procedure adds keys only. The procedure does not erase previously learned keys.
- The keys to be learned must duplicate the mechanical cut of the current key.
- With a previously learned key, turn the ignition ON.
- Turn the ignition OFF and remove the key.
- Within 10 seconds of turning OFF the ignition, insert the key to be learned and turn ON the ignition. The vehicle has now learned the new key and key.
Adding Keys (Without SPS) - Canada, Europe, South America, Asia, and Middle East
NOTE:
- To initiate, this procedure requires that 2 learned key be available.
- A total of eight keys maybe be learned to a single vehicle.
- This procedure adds keys only. The procedure does not erase previously learned keys.
- The keys to be learned must duplicate the mechanical cut of the current key.
- With a previously learned key, turn the ignition ON.
- Turn the ignition OFF and remove the key.
- With a second previously learned key, turn the ignition ON.
- Turn the ignition OFF and remove the key.
- Within 10 seconds of turning OFF the ignition, insert the key to be learned and turn ON the ignition. The vehicle has now learned the new key and key.
Adding Keys (With SPS) - North America
NOTE:
- This procedure may be used with or without existing learned keys being present.
- A total of eight keys maybe be learned to a single vehicle.
- This procedure will only learn the vehicle key information. This procedure will not learn any immobilizer information between the body control module (BCM) and engine control module (ECM).
- If the battery voltage is low, charge the battery before continuing with the procedure.
- Connect a scan tool to the vehicle and access SPS.
- Ensure that all power consuming devices are turned OFF on the vehicle.
- Select the SPS application and follow the on-screen instructions.
- Select Reprogram ECU.
- Select IMMO Immobilizer Learn - Setup.
- Select the Program Transponder or Remote Key (Add) function.
- Follow the on-screen instructions.
- After programming all keys, "Programming Complete" is displayed.
- Press the lock and unlock button on each key that was programmed. This will awaken each key and allow keyless entry functions to be established.
- With a scan tool, clear any DTCs.
- Verify each key is operating properly. Operate each of the keyless entry functions using the buttons on the key and then start the vehicle. When verifying operation, make sure that no other keys are near the vehicle.

