Chevrolet Trax: Fluid leak diagnosis (non hybrid)
General Method
- Verify that the leak is transmission fluid.
CAUTION: Do not clean using brake cleaner or other reactive solvents as these solvents can damage rubber gaskets, seals and bushings.
- Thoroughly clean the suspected leak area using a rag.
NOTE: Do not idle vehicle, this will not actuate transmission systems, and do not drive the vehicle on the freeway as this will splatter oil inhibiting leak diagnosis.
- Operate the vehicle for 15-20 minutes under city driving conditions until normal operating temperatures are reached.
- Park the vehicle over clean paper or cardboard.
- Shut OFF the engine.
- Look for fluid spots on the paper.
- Make the necessary repairs.
Powder Method
CAUTION: Do not clean using brake cleaner or other reactive solvents as these solvents can damage rubber gaskets, seals and bushings.
- Thoroughly clean the suspected leak area using a rag.
- Apply an aerosol type leak tracing powder to the suspected leak area.
NOTE: Do not idle vehicle, this will not actuate transmission systems, and do not drive the vehicle on the freeway as this will splatter oil inhibiting leak diagnosis.
- Operate the vehicle for 15-20 minutes under city driving conditions until normal operating temperatures are reached.
- Shut OFF the engine.
- Inspect the suspected leak area.
- Trace the leak path through the powder in order to find the source of the leak.
- Make the necessary repairs.
Dye and Black Light Method
A fluid dye and black light kit is available from various tool manufacturers.
- Follow the manufacturer's instructions in order to determine the amount of dye to use.
- Operate the vehicle for 24 km (15 mi) or until normal operating temperatures are reached.
- Detect the leak with the black light.
- Make the necessary repairs.
Find the Cause of the Leak
Pinpoint the leak and trace the leak back to the source. You must determine the cause of the leak in order to repair the leak properly. For example, if you replace a gasket, but the sealing flange is bent, the new gasket will not repair the leak. You must also repair the bent flange. Before you attempt to repair a leak, check for the following conditions, and make repairs as necessary:
Gaskets
- Fluid level/pressure is too high
- Plugged vent or drain-back holes
- Improperly tightened fasteners
- Dirty or damaged threads
- Warped flanges or sealing surface
- Scratches, burrs, or other damage to the sealing surface
- Damaged or worn gasket
- Cracking or porosity of the component
- Improper sealant used, where applicable
- Incorrect gasket
Seals
- Fluid level/pressure is too high
- Plugged vent or drain-back holes
- Damaged seal bore
- Damaged or worn seal
- Improper installation
- Cracks in component
- Manual shaft or output shaft surface is scratched, nicked, or damaged
- Loose or worn bearing causing excess seal wear
Possible Points of Fluid Leaks
Transmission Valve Body Cover
- Incorrectly tightened bolts
- Improperly installed or damaged gasket/seal
- Damaged mounting face
- Incorrect gasket seal
Case Leak
- Damaged input speed sensor seal
- Damaged manual shaft seal
- Loose or damaged oil cooler lines/seals
- Worn or damaged axle shaft oil seal
- Loose line pressure pipe plug or fluid level pipe plug
- Porous casting
- Warped torque converter housing
- Damaged converter housing to case seal
Leak at the Torque Converter End
- Converter leak in the weld area
- Converter seal lip cut. Check the converter hub for damage
- Converter seal bushing moved forward and damaged
- Converter seal garter spring missing from the seal
- Porous casting of the torque converter housing
Leak at the Vent
- Overfilled system
- Water or coolant in the fluid; The fluid will appear milky
- Transmission case porous
- Incorrect fluid level indicator causing an overfilled system
- Plugged vent
Leak Inspection Points
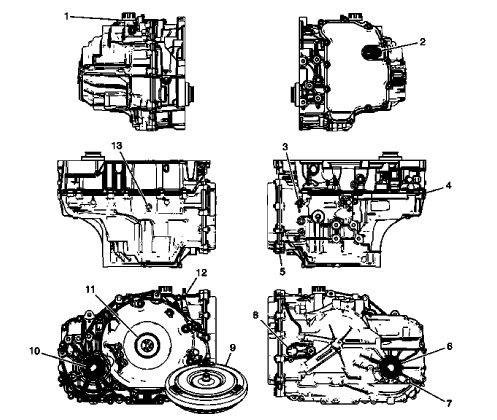
Fig. 8: Identifying Leak Inspection Points
.jpg)

CASE POROSITY REPAIR
Some external leaks are caused by case porosity in non-pressurized areas.
- Thoroughly clean the area to be repaired with a cleaning solvent. Air dry the area.
WARNING: Epoxy adhesive may cause skin irritations and eye damage. Read and follow all information on the container label as provided by the manufacturer.
- Using instructions from the manufacturer, mix a sufficient amount of an epoxy to make the repair.
- Apply the epoxy. A clean, dry soldering acid brush can be used to clean the area and also to apply the epoxy cement. Make certain that the area to be repaired is fully covered.
- Allow the epoxy cement to cure for three hours before assembling the components.
- Repeat the fluid leak diagnosis procedures.
BUSHING AND MATING SHAFT INSPECTION
NOTE: Proper bushing and corresponding mating shaft inspection should be performed before replacing the bushing, shaft, and in some cases, the component which houses the bushing. Thoroughly clean and dry the bushing and shaft surfaces before inspecting for damage.
Any of the following bushing conditions require replacement of the bushing and/or housing:
- Discoloration due to heat distress
- Misalignment or displacement of bushing as a result of spinning in housing
- Medium to heavy scoring that can be easily detected with fingernail. Light scoring is a normal condition.
- Debris embedded into the bushing lining material
- Obvious damage, including excessive and uneven wear
- Excessive polishing. Minor polishing of the bushing is an indication of normal wear and does not require replacement.
Any of the following conditions require replacement of the bushing's mating shaft:
- Discoloration due to heat distress
- Rough surface finish that can be easily detected with finger
- Obvious shaft abnormalities, including warping or uneven surfaces
- Obvious damage or cracking
READ NEXT:
 Noise and vibration analysis
A noise or vibration that is noticeable when the vehicle is in motion MAY NOT
be the result of the
transmission.
If noise or vibration is noticeable in PARK and NEUTRAL with the engine at idle,
but
Repair instructions - off vehicle
Repair instructions - off vehicle
Fig. 1: Identifying Lift Plate & Holding Fixture
Lift Plate and Holding Fixture Installation
TORQUE CONVERTER REMOVAL
Fig. 2: View Of Torque Converter
Tor
Input and output speed sensor removal
Fig. 6: View Of Input & Output Speed Sensor
Input and Output Speed Sensor Removal
TORQUE CONVERTER HOUSING WITH FLUID PUMP ASSEMBLY REMOVAL (NON HYBRID)
Fig. 7: View Of Torque Converter Hous
SEE MORE:
Off-Road Recovery
The vehicle's right wheels can drop
off the edge of a road onto the
shoulder while driving. Follow
these tips:
Ease off the accelerator and
then, if there is nothing in the
way, steer the vehicle so that it
straddles the edge of the
pavement.
Turn the steering wheel about
one-eighth of a t
Wheels and Trim-Aluminum
or Chrome
Use a soft, clean cloth with mild
soap and water to clean the wheels.
After rinsing thoroughly with clean
water, dry with a soft, clean towel.
A wax may then be applied.
Caution
Chrome wheels and other chrome
trim may be damaged if the
vehicle is not washed after driving
on roads that have been sp
