Chevrolet Trax: License Plate Lamp
.gif)
Lamp Assembly
.gif)
Bulb Assembly
To replace one of these bulbs:
- Push the left end of the lamp assembly toward the right.
- Turn the lamp assembly down to remove it.
- Turn the bulb socket (1) counterclockwise to remove it from the lamp assembly (3).
- Pull the bulb (2) straight out of the bulb socket (1).
- Push the replacement bulb straight into the bulb socket and turn the bulb socket clockwise to install it into the lamp assembly.
- Turn the lamp assembly into the lamp assembly opening engaging the clip side first.
- Push on the lamp side opposite the clip until the lamp assembly snaps into place.
Replacement Bulbs
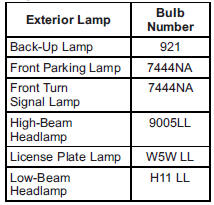
For replacement bulbs not listed here, contact your dealer.
READ NEXT:
 Electrical System
Overload
Electrical System
Overload
The vehicle has fuses and circuit
breakers to protect against an
electrical system overload.
When the current electrical load is
too heavy, the circuit breaker opens
and closes, protecting the circui
Engine Compartment Fuse
Block
To remove the fuse block cover,
squeeze the clip and lift it up.
Caution
Spilling liquid on any electrical
component on the vehicle may
damage it. Always keep the
covers on any electrical
component.
SEE MORE:
Component locator
MANUAL TRANSMISSION COMPONENT VIEWS
Shift Control and Shift Lever/Selector Lever Cable Components
Fig. 3: Shift Control and Shift Lever/Selector Lever Cable Components
Shift Shaft Components
Fig. 4: Shift Shaft Components
Clutch Housing Components - Right Hand View
Fig. 5: Locating Clutch
Vibration analysis - engine/accessory isolation
Special Tools
CH-51450-NVH Oscilloscope Diagnostic Kit (w/NVH)
EL-38792-A Electronic Vibration Analyzer (EVA) 2
EL-38792-25 Inductive Pickup Timing Light
EL-47955 Multi Diagnostic Interface MDI
For equivalent regional tools, refer to Special Tools and Equipment.
Test Description
The numbers be
© 2019-2025 Copyright www.chevtrax.com
