Chevrolet Trax: General Cooling System Service
This article is generic in nature and all information does not apply to all vehicles including those without a liquid cooling system. For vehicle specific information, see the appropriate articles in the ENGINE category.
DESCRIPTION
The liquid cooling system consists of a radiator, water pump, thermostat, electric or belt-driven cooling fan, pressure cap, heater, and various connecting hoses and cooling passages in the engine block and cylinder head.
MAINTENANCE
DRAINING
Remove radiator cap and open heater control valve to maximum heat position. Open drain cocks or remove plugs in bottom of radiator and engine block. In-line engines usually have one plug or drain cock, while "V" type engines have 2, one in each bank of cylinders.
FLUSHING
CAUTION: Some manufacturers use an aluminum and plastic radiator. Flushing solution must be compatible with aluminum.
Radiator
Connect flushing gun to water outlet of radiator. Disconnect water inlet hose. To prevent flooding engine, use a hose connected to radiator inlet. Use air in short bursts to prevent damage to radiator. Continue flushing until water runs clear.
Engine Block
To flush engine, remove thermostat. Connect flushing gun to water outlet of radiator. Use air in short bursts to prevent damage to radiator. Continue flushing until water runs clear.
REFILLING
To prevent air from being trapped in engine block, engine should be running when refilling cooling system.
After system is full, continue running engine until thermostat is open, then recheck fill level. Do not overfill system.
TESTING
THERMOSTAT
- Remove and inspect thermostat for corrosion and proper seating of valve. If okay, suspend thermostat and thermometer in a 50/50 mixture of coolant and water. See Fig. 1. DO NOT allow thermostat or thermometer to touch bottom or container. Heat water until thermostat begins to open.
- Read temperature on thermometer. This is the initial opening temperature and should be within specification. Continue heating water until thermostat is fully open and note temperature. This is the fully open temperature. If either reading is not to specification, replace thermostat.
.gif)
Fig. 1: Testing Thermostat in Coolant/Water Solution
PRESSURE TESTING
A pressure tester is used to check both radiator cap and complete cooling system. Follow pressure tester manufacturer instructions and test components as follows:
Radiator Cap
Visually inspect radiator cap. If cap looks okay, connect pressure tester to cap. See Fig. 2. Pressurize tester to full radiator cap specification. Replace cap if it fails to hold pressure.
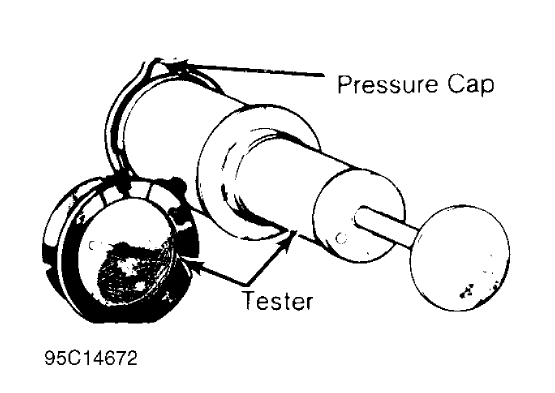
Fig. 2: Pressure Testing Radiator Cap
Cooling System
- Turn ignition off and allow engine to cool. Ensure radiator if filled to correct level. Remove cap and attach pressure tester to radiator. Pressurize tester to full radiator rating specification.
- If pressure drops, check for external leaks. If no leaks are found, start engine and allow to idle. If pressure builds up immediately, check cylinder head and block for cracks. If pressure does not build up immediately, go to next step.
CAUTION: DO NOT allow excess pressure to build in cooling system or damage may result.
- Using pressure tester, pump cooling system up to pressure specified on radiator cap. If pump gauge pointer vibrates, compression or combustion leak into cooling system is indicated. Isolate leak by shorting each spark plug wire to cylinder block. Gauge pointer vibration will stop or decrease when leaking cylinder is shorted.
READ NEXT:
 Manual Transmission Trouble Shooting
NOTE: This is GENERAL information. This article is not intended to
be specific to any
unique situation or individual vehicle configuration. For model-specific
information see appropriate articles whe
Parasitic Load Explanation & Test Procedures
NOTE: This is GENERAL information. This article is not intended to
be specific to any
unique situation or individual vehicle configuration. For model-specific
information see appropriate articles whe
Symptom Check List Worksheets
NOTE: This article is intended for general information purposes
only. It does not apply
specifically to one make or model.
PURPOSE
NOTE: This article is intended for general information purposes
onl
SEE MORE:
Diagnostic information and procedures
SPECIFICATIONS
FASTENER TIGHTENING SPECIFICATIONS
Fastener Tightening Specifications
DIAGNOSTIC INFORMATION AND PROCEDURES
SYMPTOMS - PARK BRAKE
NOTE: Review the system operation in order to familiarize yourself
with the system
functions. Refer to Park Brake System Description and Operation
Visua
Symptom Check List Worksheets
NOTE: This article is intended for general information purposes
only. It does not apply
specifically to one make or model.
PURPOSE
NOTE: This article is intended for general information purposes
only. It does not apply
specifically to one make or model.
WHY USE THE SYMPTOM CHECK LIST WORKSHEETS?
O
