Chevrolet Trax: Drivetrain and front suspension frame replacement (short cradle)
Removal Procedure
- Raise and support the vehicle. Refer to Lifting and Jacking the Vehicle .
- Remove the front tire and wheel assembly. Refer to Tire and Wheel Removal and Installation .
- Remove the drivetrain and front suspension frame transmission protector from the front frame, if equipped. Refer to Drivetrain and Front Suspension Frame Transmission Protector Replacement.
- Remove the front compartment front center insulator, if equipped. Refer to Front Compartment Front Center Insulator Replacement.
- Disconnect the lower ball joints from the steering knuckles. Refer to Lower Control Arm Replacement .
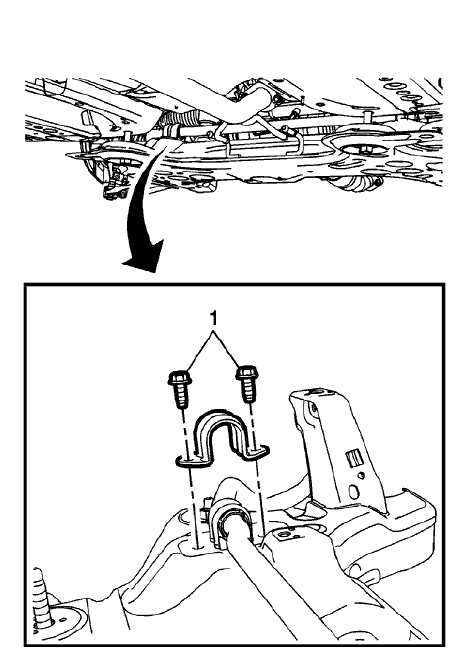
Fig. 17: Stabilizer Shaft Insulator Bracket And Bolts
- Remove the four fasteners (1) retaining the stabilizer shaft to the drivetrain and front suspension.
.gif)
Fig. 18: Steering Rack Retaining Bolts And Exhaust Isolators
- Remove the steering rack retaining fasteners (1) and discard.
- Using mechanics wire, secure the power steering gear and stabilizer shaft to the vehicle.
- Disconnect the hydraulic power steering hoses from the front frame.
- Disconnect the exhaust isolators (2) from the front suspension frame.
- Disconnect the power brake booster pump hose and connector, if equipped.
.gif)
Fig. 19: Transmission Mount Bracket To Rear Mount Through Bolt
- Remove the rear transmission mount bracket to rear mount through fasteners (1).
- Using a suitable support table or equivalent, support the front suspension frame.
.gif)
Fig. 20: Upper Frame Suspension Retaining Bolts
- Remove the two upper frame suspension retaining fasteners (1).
.gif)
Fig. 21: Frame Rear Fasteners
- Remove the two frame rear fasteners (1).
- Remove the frame (2) from the vehicle.
- Remove the following components, if replacing the frame:
- The lower control arms-Refer to Lower Control Arm Replacement .
- The power brake booster pump, if equipped-Refer to Power Brake Booster Pump Replacement .
- The rear transmission mount bracket-Refer to Transmission Mount Bracket Replacement - Rear (AWD) , Transmission Mount Bracket Replacement - Rear (FWD) .
Installation Procedure
- Install the following components on the drivetrain and front suspension frame if removed:
- The rear transmission mount bracket-Refer to Transmission Mount Bracket Replacement - Rear (AWD) , Transmission Mount Bracket Replacement - Rear (FWD) .
- The power brake booster pump, if equipped-Refer to Power Brake Booster Pump Replacement .
- The lower control arms-Refer to Lower Control Arm Replacement
- Install the frame into the vehicle.
.gif)
Fig. 22: Front Suspension Frame And Floor Panel
- Using a commercially available guide pin, have an assistant vertically insert and hold the pins through the front suspension frame and floor panel (1).
.gif)
Fig. 23: Frame Rear Fasteners
CAUTION: Refer to Fastener Caution .
- Install the frame (2) rear fasteners (1) and tighten:
- First Pass:100 (74 lb ft).
- Final Pass: an additional 60 to 75 degrees.
.gif)
Fig. 24: Upper Frame Suspension Retaining Bolts
- Install the two upper frame suspension retaining fasteners (1) and tighten to 135 N.m (100 lb ft).
- Remove the wire retaining the power steering gear and stabilizer shaft to the vehicle.
.gif)
Fig. 25: Steering Rack Retaining Bolts And Exhaust Isolators
- Install the steering gear retaining fasteners (1). Refer to Steering Gear Boot Replacement .
- Connect the hydraulic power steering hoses to the front frame.
- Connect the exhaust isolators (2) to the front suspension frame.
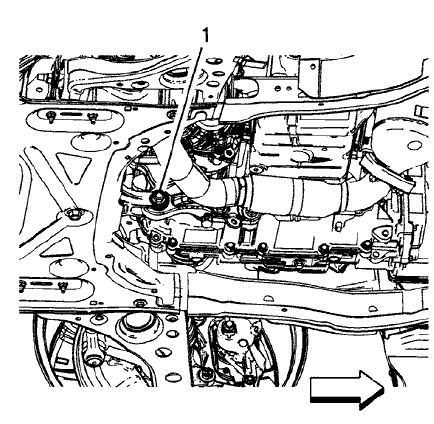
Fig. 26: Transmission Mount Bracket To Rear Mount Through Bolt
- Install the rear transmission mount bracket to rear mount through fasteners (1). Refer to Transmission Rear Mount Replacement (AWD) , Transmission Rear Mount Replacement (FWD) .
- Connect the power brake booster pump hose and connector, if equipped.
- Connect the lower ball joints to the steering knuckles. Refer to Lower Control Arm Replacement
.gif)
Fig. 27: Stabilizer Shaft Insulator Bracket And Bolts
- Connect the stabilizer shaft to the drivetrain and front suspension frame. Refer to Stabilizer Shaft Replacement .
- Install the front compartment front center insulator, if equipped. Refer to Front Compartment Front Center Insulator Replacement.
- Install the drivetrain and front suspension frame transmission protector
to the front frame, if equipped.
Refer to Drivetrain and Front Suspension Frame Transmission Protector Replacement.
- Install the front tire and wheel assembly. Refer to Tire and Wheel Removal and Installation .
- Lower the vehicle.
FRONT WHEELHOUSE LINER REPLACEMENT (ENCORE)
.gif)
Fig. 29: Front Wheelhouse Liner
Front Wheelhouse Liner Replacement (Encore)
.jpg)
REAR WHEELHOUSE LINER REPLACEMENT
.gif)
Fig. 30: Rear Wheelhouse Liner
Rear Wheelhouse Liner Replacement
.jpg)
REAR WHEELHOUSE PANEL AIR DEFLECTOR REPLACEMENT
.gif)
Fig. 31: Rear Wheelhouse Panel Air Deflector
Rear Wheelhouse Panel Air Deflector Replacement
.jpg)
