Chevrolet Trax: Brake drum diameter measurement
SPECIFICATIONS
FASTENER TIGHTENING SPECIFICATIONS
Fastener Tightening Specifications

DRUM BRAKE COMPONENT SPECIFICATIONS
Drum Brake Component Specifications

DIAGNOSTIC INFORMATION AND PROCEDURES
BRAKE DRUM DIAMETER MEASUREMENT

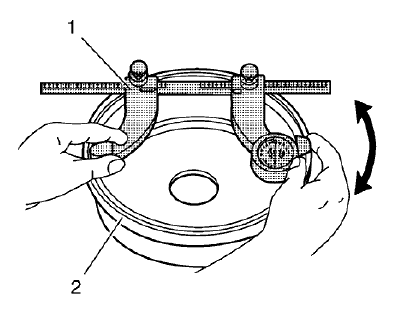
Fig. 1: Measuring Brake Drum Diameter
WARNING: Refer to Brake Dust Warning .
- Remove brake drum. Refer to Brake Drum Replacement
- Clean the brake shoe lining contact surface of the brake drum (2) with denatured alcohol or an equivalent approved brake cleaner.
- Using a brake drum micrometer (1) calibrated in thousandths-of-an-inch,
measure and record the largest
diameter of the brake drum at four or more points, equally spaced around the
drum.
Ensure the measurements are only taken within the brake shoe lining contact area. The micrometer must be positioned the same distance from the outside edge of the drum for each measurement.
- Compare the largest diameter measurement recorded to the brake drum component specifications. Refer to Drum Brake Component Specifications.
- If the largest diameter measurement of the brake drum is less than the maximum allowable inside diameter after refinishing specification; the drum may be refinished, depending upon surface and wear conditions.
- If the largest diameter measurement of the brake drum is equal to or greater than the maximum allowable diameter after refinishing specification; the drum may not be refinished.
- If the largest diameter measurement of the brake drum is equal to or greater than the discard diameter specification; the drum requires replacement.
- Install brake drum. Refer to Brake Drum Replacement.
BRAKE DRUM SURFACE AND WEAR INSPECTION
Special Tools
CH-8001 Dial Indicator Set
For equivalent regional tools, refer to Special Tools.
WARNING: Refer to Brake Dust Warning .
- With the brake drum removed, clean the brake shoe lining contact surface of the brake drum with denatured alcohol or an equivalent approved brake cleaner.
- Inspect the braking surface of the brake drum for the following braking surface conditions:
- Heavy rust and/or pitting
Light surface rust can be removed with an abrasive disc; heavy surface rust and/or pitting must be removed by refinishing the drum.
- Cracks and/or heat spots
- Excessive blueing discoloration
- Missing balance weights
- If the braking surface of the brake drum exhibits one or more of the braking surface conditions listed, the drum requires refinishing or replacement.
.gif)
Fig. 2: Drum Brake Micrometer
- Using a brake drum micrometer calibrated in thousandths-of-an-inch, measure and record any grooves present on the drum braking surface.
Ensure that the measurements are only taken within the brake shoe lining contact area.
- Compare the groove, or scoring depth recorded to the following specification:
Specification
Brake drum maximum allowable scoring: 0.50 mm (0.020 in)
- If the brake drum scoring depth exceeds the specification, or if an excessive amount of scoring is present, the drum requires refinishing or replacement.
- Mount the brake drum on a brake lathe.
.gif)
Fig. 3: Dial Indicator And Brake Drum
- Mount a dial indicator, CH-8001 indicator (1), or equivalent, and position the indicator button so it contacts the braking surface of the brake drum (2) at a 90 degree angle, approximately 19 mm (0.75 in) from the outer edge of the drum.
- Measure and record the radial runout of the brake drum.
- Rotate the drum until the lowest reading is displayed on the indicator dial, then zero the dial.
- Rotate the drum until the highest reading is displayed on the dial.
- Compare the radial runout of the brake drum to the following specification:
Specification
Brake drum maximum allowable radial runout: 0.04 mm (0.002 in)
- If the brake drum radial runout exceeds the specification, the drum requires refinishing or replacement.

