Chevrolet Trax: Backup lamp switch replacement
.gif)
Fig. 42: Backup Lamp Switch
Backup Lamp Switch Replacement
.jpg)
TRANSMISSION REAR MOUNT REPLACEMENT (AWD)
Removal Procedure
- Remove the transfer case. Refer to Transfer Case Replacement .
.gif)
Fig. 43: Transmission Bracket Bolts
- Remove and DISCARD the five transmission bracket bolts (1).
.gif)
Fig. 44: Transmission Bracket
- Remove and DISCARD the transmission rear mount through bolt (1).
- Remove the transmission bracket (2) from the transmission.
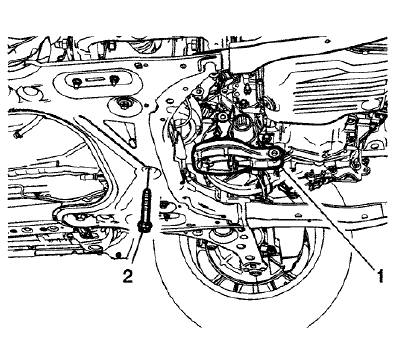
Fig. 45: Transmission Rear Mount
- Remove and DISCARD the transmission rear mount fastener (2).
- Remove the transmission rear mount (1) from the vehicle.
Installation Procedure
.gif)
Fig. 46: Transmission Rear Mount
- Install the transmission rear mount (1) to the vehicle.
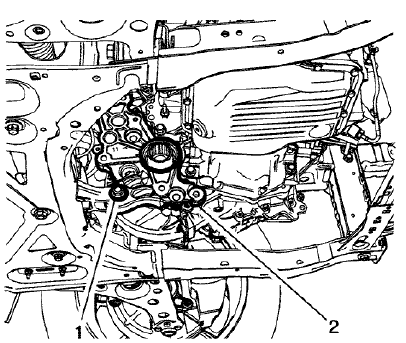
Fig. 47: Transmission Bracket
- Install the transmission bracket (2) to the transmission.
.gif)
Fig. 48: Transmission Bracket Bolts
CAUTION: Refer to Fastener Caution .
- Install the NEW transmission bracket to transmission bolts (1) and tighten to 100 (74 lb ft) plus 30-40 degrees.
.gif)
Fig. 49: Transmission Rear Mount
- Install the NEW transmission rear mount fastener (2) and tighten to 100 (74 lb ft) plus 90-105 degrees.
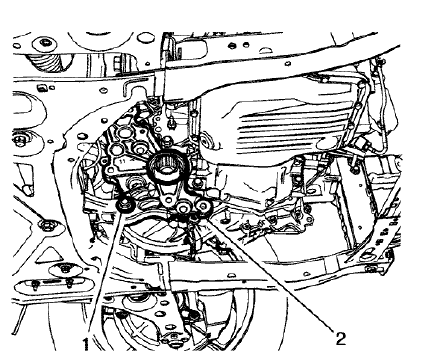
Fig. 50: Transmission Bracket
- Install the NEW transmission rear mount through bolt (1) and tighten to 80 (59 lb ft) plus 45-60 degrees.
- Install the transfer case. Refer to Transfer Case Replacement .
TRANSMISSION REAR MOUNT REPLACEMENT (FWD)
Removal Procedure
- Raise and support the vehicle. Refer to Lifting and Jacking the Vehicle .
- Remove the exhaust front pipe. Refer to Exhaust Front Pipe Replacement (LUV) , Exhaust Front Pipe Replacement .
- Using a suitable jack stand, support the rear of the powertrain.
.gif)
Fig. 51: Transmission Rear Mount Bracket Through Bolt
- Remove and DISCARD the transmission rear mount to bracket through bolt (1).
- Remove and DISCARD the transmission rear mount bolt (2).
.gif)
Fig. 52: Transmission Rear Mount Bracket And Bolts
- Remove and DISCARD the transmission rear mount bracket fasteners (1).
- Remove the transmission rear mount and the transmission rear mount bracket.
Installation Procedure
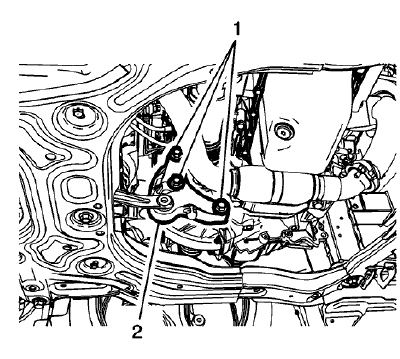
Fig. 53: Transmission Rear Mount Bracket And Bolts
- Install the transmission rear mount and the transmission rear mount bracket.
CAUTION: Refer to Fastener Caution .
- Install the NEW transmission rear mount bracket fasteners (1) and tighten to 100 (74 lb ft) plus 30-45 degrees.
.gif)
Fig. 54: Transmission Rear Mount Bracket Through Bolt
- Install the NEW transmission rear mount bolt (2) and tighten to 100 (74 lb ft) plus 90 - 105 degrees.
- Install the NEW transmission rear mount to bracket through bolt (1) and tighten to 80 (59 lb ft) plus 45- 60 degrees.
- Remove the jack stand.
- Install the exhaust front pipe. Refer to Exhaust Front Pipe Replacement (LUV) , Exhaust Front Pipe Replacement .
- Lower the vehicle.
TRANSMISSION MOUNT REPLACEMENT - LEFT SIDE
Removal Procedure
- Remove the battery tray. Refer to Battery Tray Replacement .
- Install the engine support fixture. Refer to Engine Support Fixture .
.gif)
Fig. 55: Left Transmission Mount
- Remove and DISCARD the left transmission mount to bracket bolts (1).
- Remove the left transmission mount to body bolts (2).
- Remove the left transmission mount to body nut (3).
- Remove the left transmission mount (4) from the vehicle.
Installation Procedure
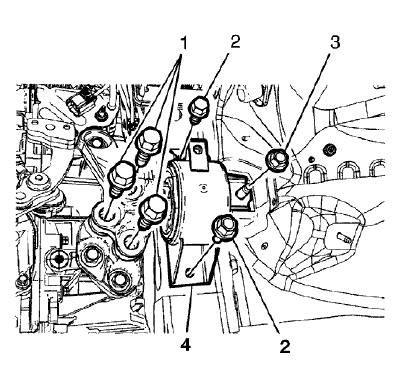
Fig. 56: Left Transmission Mount
- Install the left transmission mount (4) to the vehicle.
CAUTION: Refer to Fastener Caution .
- Install the left transmission mount to body bolts (2) and tighten to 58 (43 lb ft).
- Install the left transmission mount to body nut (3) and tighten to 58 (43 lb ft).
- Install the NEW left transmission mount to transmission bolts (1) and tighten to 50 (37 lb ft) plus 60-75 degrees.
- Remove the engine support fixture. Refer to Engine Support Fixture
- Install the battery tray. Refer to Battery Tray Replacement .
TRANSMISSION MOUNT BRACKET REPLACEMENT - REAR (AWD)
Removal Procedure
- Remove the transfer case. Refer to Transfer Case Replacement .
.gif)
Fig. 57: Transmission Bracket Bolts
- Remove and DISCARD the five transmission bracket bolts (1).
.gif)
Fig. 58: Transmission Bracket
- Remove and DISCARD the transmission rear mount through bolt (1).
- Remove the transmission bracket (2) from the transmission.
Installation Procedure
.gif)
Fig. 59: Transmission Bracket
- Install the transmission bracket (2) to the transmission.
.gif)
Fig. 60: Transmission Bracket Bolts
CAUTION: Refer to Fastener Caution .
- Install the NEW transmission bracket to transmission bolts (1) and tighten to 100 (74 lb ft) plus 30-40 degrees.
.gif)
Fig. 61: Transmission Bracket
- Install the NEW transmission rear mount through bolt (1) and tighten to 80 (59 lb ft) plus 45-60 degrees.
- Install the transfer case. Refer to Transfer Case Replacement .
